Showing posts with label wreaths. Show all posts

Thursday, January 16, 2014

Love Day Wreaths!!

I am back people!!
It has been almost a year since I last blogged! It is time for me to stop being lazy and to get back to what I love.
Crafts
&
Blogging!!
 
 
It is Love Day time. Which means I get to make some wreaths for my doors.
We have moved to a new city and the house we are renting has two doors. A front door and a side door.
What does this mean?
I get to have twice as much fun as before!
This year, with the help of Pinterest and some divine inspiration we have two very different wreaths.
 
 
The red one is my favorite. I was walking through Joann's and having a hard time coming up with any sort of inspiration for this project. I looked over and
BAM!!
There was a square, metal wreath frame.
A picture popped into my head.
I probably looked like a crazy lady to the people around me cause I just started darting everywhere in the store.
To make it I bought red felt by the yard. I bought 3 yards of felt. I had extra but hey...
Better to have too much than not enough!
 
 
Now to the cutting. I just cut about 8 inch by 1.5 inch strips. It is a totally random number, that is just the size that looked good to my eye.
Fun part now.
Pick a good TV show on Netflix, grab a comfy spot with lots of room, your favorite beverage on hand, and
start tying!!
I crammed as many as I could fit on that baby! A full knot is not needed, half a square not is good. The felt holds to itself pretty well.
Keep knotting until you get a nice full square.


It still looks a tad nekkid to me. I didn't want to overdo it so a simple burlap ribbon bow was just the thing.
Attach wherever you like and
"Beautiful, Gorgeous, Wish you were here!!"


The Side Door Wreath:
 
I had 2 balls of pink yarn. I am currently trying to depleat my yarn supply. The bucket is too full, and they always unravel only to make a giant ball of mess.
Drives me nuts.
Back to the project!
A 14 inch foam wreath, 2 balls of leftover pink yarn, gray and smoky gray felt squares, pink buttons, a glue gun, a strip of unbleached muslin, red marker, red and white bakers twine and a ribbon to hang it with.
 
I wrapped the wreath until I was out of yarn. I always do the first layer pretty even to cover the foam. After that I just wrap trying to make sure they stay realtively even.
I like the look of the string showing.
 
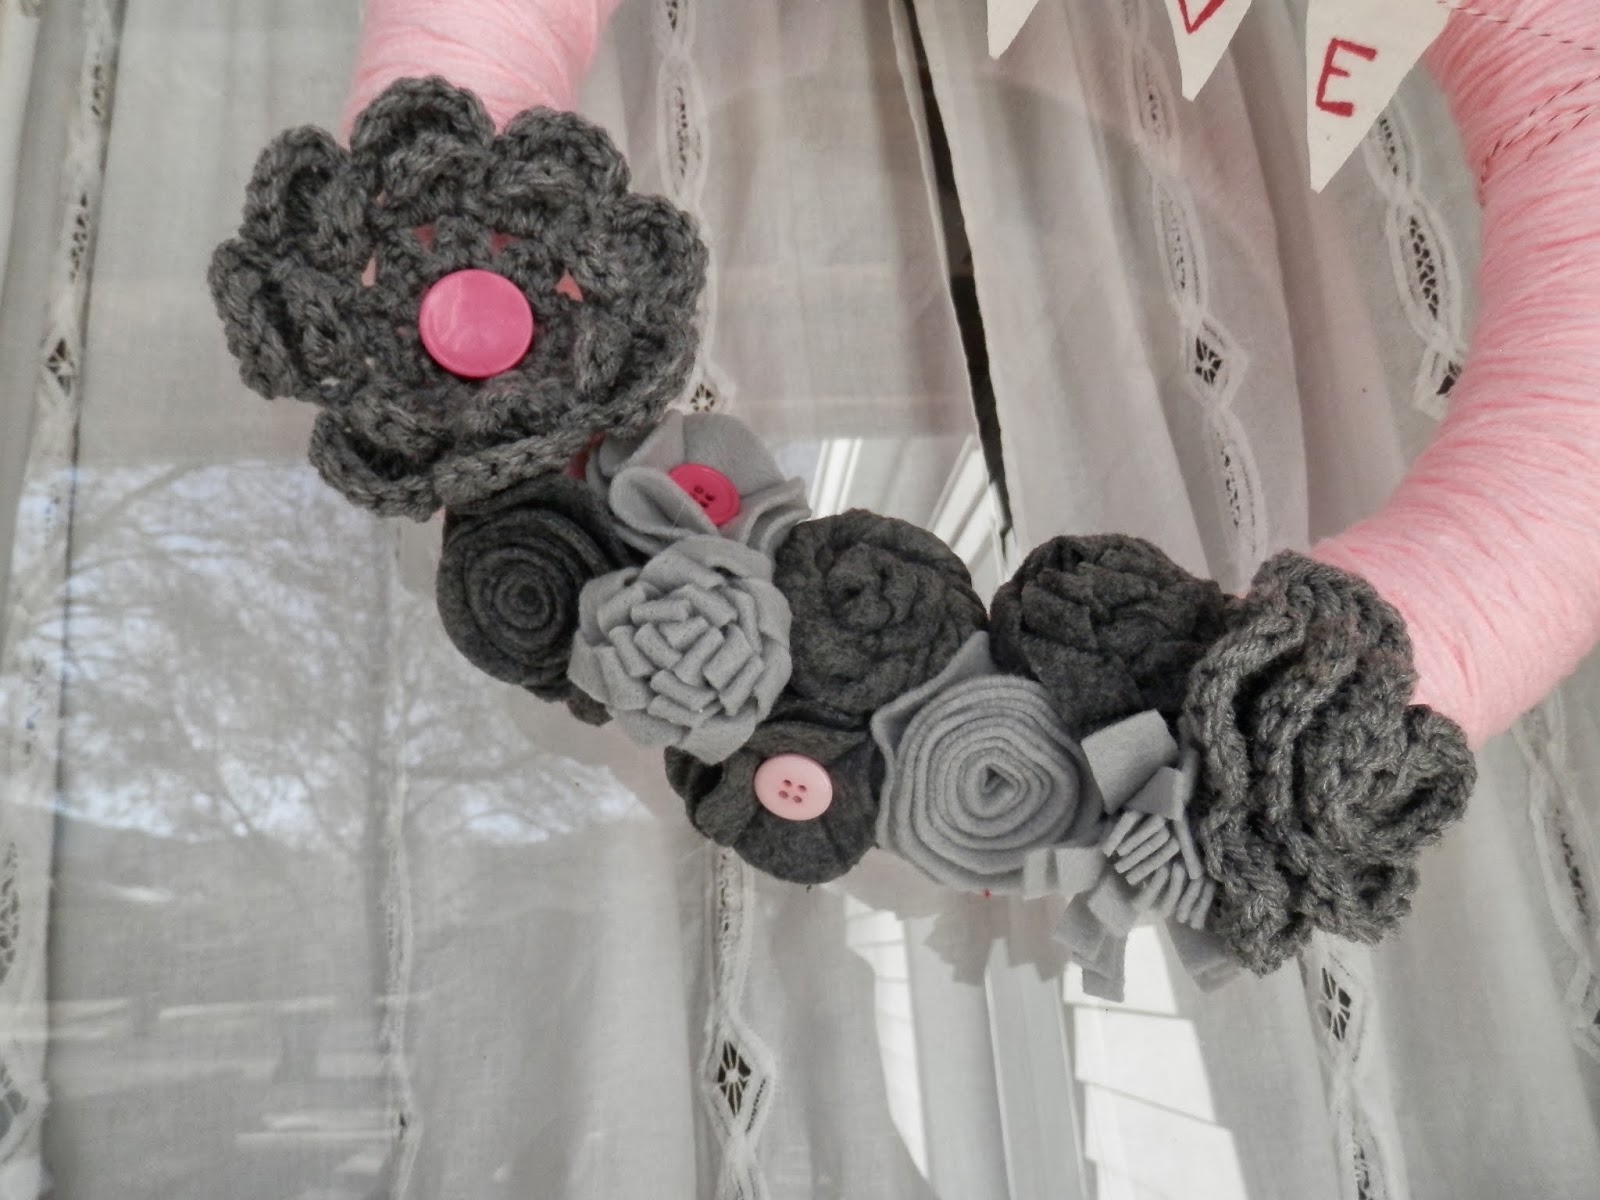
For the flowers I went on Pinterest and looked up felt flowers. I copied a bunch of patterns and made up a few of my own. For the crocheted flowers I did the same thing.

 
I scrounged through my pink buttons and found some to glue in the middle for some color.
For the banner I just free handed some pennants out of unbleached muslin.
 The bakers twine was put on a needle and I just wove the needle through the fabric, wrapped the ends around the wreath and secured it with a pin.
Sharpie love for the letters.
and...


Beautimus!!!


Hope you like them.
I promise to keep them coming!
My goal is to
Craft
Blog
Craft
Blog
Craft
Blog
You get the drift!
V.

Monday, March 5, 2012

Fireplace Mantle: March

It is St. Patrick's Day time.
Time for some lucky charms, rainbows and lots of green.
I found the subway art at Today's Fabulous Finds.  
 This last week our daughter Grace, was home from school sick. She is a crafty girl. We decided we needed a rainbow for the pot of gold. 
She colored some macaroni in the six rainbow colors. (I took pics but accidently deleted them... I don't wanna talk about it.) Add the gold coins and you have a very cute rainbow with it's pot of gold.
 I made this shamrock last year and had it stuck to a stake in the yard. I like it where it is now. It is made out of 2x4s. I can't remember where I got the pattern or the measurements anymore but if I do I will post them.
 This month the wreath was fun. I cut circles out of dark, medium and light green felt, put the eraser end of a pencil in the center, added a dab of hot glue and glued away. It took about a 1/2 a yard of each color. 
I love it.
The little tray is a trivet I found at the thrift store and added white vinyl shamrocks to. The white kinda broke up the green a bit.
 I found this vase at the same thrift store I found the trivet and had to have it. The yellow flowers I found at Michael's on sale. I got some plain yellow and some polka dotted. The nice thing about buying the fake flowers is you will probably see them again for Easter time! 
 What is a mantle without a bunting. This one is some homemade bakers twine I learned to make here. The shamrocks I cut out of  cute plaid kelly green and gold scrapbook paper. I cut a pattern out on my Silhouette in cardstock and traced it on the cute paper. I got 3 out of each 12x12 inch piece. I put 2 holes in the top and laced it through. It is tight enough that they pretty much stay where they belong.
Hope you all have a 
Happy St. Patrick's Day!!
Click HERE for a list of all the parties I am linking to this week.

Thursday, February 2, 2012

Fireplace Mantle: February

It is the Month of Love!
The mantle is up! I get excited every month that I get to decorate. This month is is all about pink, red and white.
I moved the mirror to the wall above the fireplace. I think it looks great. (Now I have a naked wall I get to decorate!)
 I found this idea here. My letters are a little crooked but for my first big Silhouette project I am happy with it.
 I love Styrofoam wreath forms. No gluing required. This is covered with fuzzy red fabric and pinned with satin pins. The love sign I found at Michael's craft for $1. I just added some red dots and BAM prettiness!
 Another Michael's for a buck find was this wooden heart frame. I painted it ballet shoe pink (Krylon spray paint). The scrapbook paper I cut a little big so that it would poof out in the front. I don't think you can really tell in the picture. 
 Can you really go wrong with candy? I E6000 glued the small jar to a candlestick. I love straight vases. Add candy and the hardest thing to do is not eat it all. See the little red stick pins? I didn't know how to keep the heart bunting up. I tied a cute bow and pinned it with red stick pins. Luckily the mantle is tough enough to handle the tiny hole.
 These are the same tree forms from the January mantle. I just covered them with yarn. It took 2 layers. A little bit of girly lace and some red ribbon and you got it!
The bunting idea I also found here. This was my favorite party to make. Thank you Landee for letting me copy craft you.
Hope you enjoy the mantle. 
Happy Heart Day!! 
Linking up to these parties!

featured button


Home Stories A2Z
Photobucket

Tuesday, January 17, 2012

Fireplace Mantle: January

This is what our fireplace looked like when we first moved into our house in 2003.
Notice the rubber bumper on the edge? Even with that on there 2 of the kids hit their heads and had to go to the ER for stitches. After dealing with it for a good 5 years I ripped the thing out. 
Needless to say the hubby wasn't too thrilled with me. We agreed that we would rebuild the wall and put in the new tile. I had the job of building the mantle. Once he got his part done it was my turn.
I finally got it done. 
I have to brag for a second. I built it myself. Not from a kit. I bought the wood, measured it, cut it, and while Sean held it together I nailed. 
There I am done patting myself on my back.
This is the first month I have gotten to decorate it.
I am still working on finding something for the wall behind. I could change it every time I decorate the shelf but I am thinking a mirror would be good. That is the skinniest part of the room and maybe a mirror would make it look wider. I am up for suggestions.
The wreath is a straw wreath wrapped with navy yarn. I wish I had primed or spray painted the wreath before I started so that the straw poking out wouldn't have shown so much. 
I then held a piece of soft white and baby blue yarn and made the x's. 
I had some leftover fuzzy felt from the ribbon tree. I made a few rolled flowers. The snowflakes I cut out on my Silhouette.
I love it!
I found this subway art here.
The frame I found at the thrift store. It is great when you find something re-usable!
This is my favorite. The trees. The bases are glass candlesticks spray painted white. There are Styrofoam cones underneath. 
The smaller tree is covered with fuzzy white felt, and a ribbon is twisted around with a bow on top. I just used satin pins so that I can re-use. The other tree is made with a larger Styrofoam cone. I cut 4 inch squares of white felt. Gathering the corners together I pinned them in a circle with satin pins. The berries are small Styrofoam balls spray painted blue. 
More detailed directions are here.
Chip letters covered with scrapbook paper and ripped on the edges finished out the picture. Leftover silver berries added a little depth to the entire picture.
I am looking forward to showing you more ideas and decorations for the mantle in the future. Keep your eyes out for
Valentine's Day design next month!!

Check out the Linky Party tab to see all the parties this post is linked to.

Friday, May 13, 2011

I Spy: Homemade Edition

So, over at 
she posts an I Spy activity every week. This week is handmade edition. 
Here is the Heiner version!

I don't know when I became obsessed with "H"s but suddenly I had tons of them everywhere in the house. 


It started with this lawn chair. It is one of those metal ones that bounce. I love it. There were at least 5 coats of paint on it. I painted it green to match the house and put an H on it.


At the end of the hallway it is dark. (waiting for hubby to install a plug) so I decorated it with black and white "H"s.
It is still a work in progress. Whenever I am out I search out cool designs.


On a day when all the kids were in school, you know those times when you can actually just stroll and look at all the good stuff in the stores. I visited a local antique store. They had a bin full of real silver silverware. I tried to pick out the most unique designs. The frame is from the thrift store and the fabric is from my stash. Please ignore the wall. It has been patched but not painted...yet.


Ok, so technically the sign isn't handmade. I found it at Hobby Lobby but the letters hanging from it are handpainted :). They are the kiddos initials. I have had the wooden letters hanging around for forever and finally when I saw those 4 pegs I figured what the heck!! Now everyone who comes to the house knows where the loo is!


One of my favorite handmade projects is this Jesus and Joseph Smith cross stitches. I made these a long time ago and never had anywhere to put them. Honestly I was scared to cut them to put them in the frame. It was a lot of work and the thought of messing it up by cutting them wrong scared the crud outta me! 


This is my most recent handmade lovely. My spring wreath. It is hanging on the door and finally spring has found it's way here. I love the bright colors against the white. 
 If anyone has ideas for a patriotic something for my front door, leave a comment with a link.


Here is my handmade mess! My sewing table. I always start out clean but it very rarely stays that way.

Friday, February 25, 2011

St. Paddy's Day Wreath

Our door is naked after Valentine's Day. 
I have decided to be more industrious and make something for the door each holiday. 
(I cheated and bought the heart day decor). 
First I found a styrofoam wreath, some ribbon on sale and some gold coins.
See my stash from the sale at Joann's this weekend!

I tried to wrap the ribbons together but that didn't work for me. In all my need for them to be spaced perfectly I wrapped the dark green grosgrain ribbon first, it took a spool and a half, and then the lighter ribbon using a ruler to evenly space it all out.

From my deep, dark drawer of felt I found some green to make some flowers. I also learned that taking pictures at night are not the best idea in the world. They always come out yellow.
Anyhoo...

 Here is the finished product out on the front door. I lurve it. It was fun and easy to make. 
The most expensive part was the wreath. It was $4.99. I had the felt, the light ribbon I found in the dollar bin, and the dark ribbon I used my handy dandy coupons. I did splurge on the gold coins, but that was $2.99 for 20. Multiple projects my friends! Overall cost??? I would say around 10 bucks. Not bad I say.
This picture I just have to share so you can see that it is snowing... again
More St. Patrick's Day crafts are in the works so keep an eye out!